

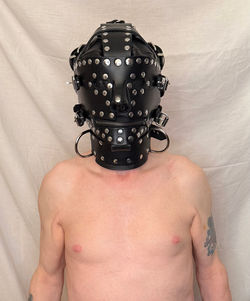
The text description of this Sci-Fi Leather hood has been taken from Fetters™️ website. The Sci-Fi Hood was originated by Fetters since 1976. I am proud to have discovered Fetters in the seventies and have purchased many products from them, mostly custom made.
The Sci-Fi Leather Hood is my second favourite hood after the Heavy Duty Leather Hood. This is also available through Regulation online or instore

 |  |  |  |
|---|---|---|---|
 |  |  |  |
 |  |  |  |
 |  |  |  |
 |  |  |  |
 |  |  |  |
 |  |  |
HOW TO PUT ON AND REMOVE THE SCI-FI HOOD
Most leather hoods with a rear entrance are fitted in a similar way. Rear-entry latex hoods require a slightly different approach, while over-the-head hoods are fitted differently again.
The Sci-Fi Hood is constructed from heavy-duty, semi-rigid hide leather, similar in quality and weight to traditional motorcycle leathers.
The first thing you may notice when placing the hood over your head is that distinctive, familiar smell of leather. For many people, that sensory experience is part of the attraction even before the lacing and straps are secured.
DO'S AND DON'TS
I don't want to preach to experienced users—you may already know exactly what works for you. These instructions are primarily intended for new users, or for those with some experience who want to explore wearing the hood more confidently.
DON'T PANIC
It sounds obvious, but it's worth saying: don't panic.
Never overtighten the laces or straps.
The aim is to secure the hood comfortably and evenly. Something that feels excitingly tight at first can quickly become uncomfortable. Excessive pressure around the head can also make it difficult to think clearly if you later want to remove the hood.
If you become uncomfortable, stop and take your time. Think back through the steps you used to put the hood on and simply reverse them. Don't pull or force anything.
Remember that this is a substantial piece of leather equipment. Treat it carefully and avoid rushing when putting it on or taking it off.
A correctly fitted hood should feel secure, comfortable and controlled.
If this is your first time wearing an enclosed hood, don't do it alone. Have a trusted partner present who understands how the hood works and can remove it quickly if necessary.
PUTTING THE HOOD ON
1. Prepare the lacing
Begin by undoing the lacing from approximately halfway downwards. The upper section can remain laced, but loosen it slightly.
If this is your first time, it may be easier to undo the entire lace so that you can concentrate on positioning the hood correctly.
Take your time. The excitement and anticipation can be considerable, but staying relaxed will make the whole process much easier.
2. Position the hood
Place the loose hood over your head and position the chin area correctly.
Using the palms of your hands, gently push inside each side of the hood. Check that both ears are sitting naturally and are not folded or bent into an uncomfortable position.
Take a moment to make sure everything feels right before you begin tightening anything.
3. Check the internal flap
Reach around the back of the hood, underneath the lacing, and check the internal leather flap.
Make sure it is lying flat rather than curled or folded. A misplaced flap can become uncomfortable and may affect the hood's fit.
4. Check the openings
Feel around the front of the hood and make sure your eyes, nose and mouth are correctly aligned with their respective openings.
Adjust the hood using both hands at the sides of your head until everything is comfortably positioned.
Before continuing, make sure you can breathe comfortably and that nothing is obstructing your airway.
5. Lace the hood
Start threading the lace, keeping it relatively loose at first.
Gradually work from the top downwards, pulling evenly on both sides at each level of eyelets. Once all the eyelets have been threaded, make a final adjustment so that the hood is secure without being excessively tight.
Fasten the lace securely.
6. Position the leather strap cover
Flip the leather strap fastener over the back of the head so that it covers the lacing.
7. Fasten the straps
Begin fastening the straps from the top and work downwards, finishing with the collar.
I find it helpful to feel for the strap holes on both sides and keep the adjustment symmetrical. For example, you might initially use the same hole position on each side of every strap. Work your way down the hood, checking the fit as you go.
If the hood feels too loose, adjust the straps again from the top downwards. Make small adjustments rather than tightening everything at once.
Do not overtighten. The hood should feel secure without creating painful pressure points.
8. Fasten the collar
Finally, fasten the collar to a comfortable setting.
If this is your first experience with an enclosed hood, do not lock the collar. Simply fasten the buckle and secure the strap normally.
Take a few calm breaths and check that everything remains comfortable.
BLINDFOLD, MOUTH COVER AND OTHER ACCESSORIES
The hood can be worn with or without the blindfold and mouth covering, depending on its configuration and your preference.
If using any additional equipment, introduce it gradually and make sure you remain able to breathe comfortably.
For beginners especially, it's best to become familiar with the hood itself before adding anything that further restricts communication, breathing or sensory awareness.
If another person is controlling the scene, agree beforehand on a clear method of communication and an immediate way to stop the scene.
GETTING USED TO THE HOOD
Once everything is comfortably secured, take some time to relax and become accustomed to the sensations.
The smell and feel of the leather, combined with reduced vision and sound, can create an intense sensory experience.
As you gain experience, the process of putting on and removing the hood will become much more familiar. What initially requires concentration will eventually become a straightforward routine.
If you're wearing the hood as part of a scene, agree in advance how long it will remain on and establish regular safety checks.
A timer can also help you keep track of time, particularly when sensory awareness is reduced.
Never sleep while wearing an enclosed hood or leave yourself unable to remove it quickly. Even if previous experiences have been comfortable, circumstances can change unexpectedly.
REMOVING THE HOOD
Removing the hood is essentially the reverse of putting it on.
1. Start with the collar
Begin by releasing the collar and then work upwards through the straps.
Undo the straps from the bottom upwards rather than trying to pull the hood off while it is still secured.
2. Release the strap cover
Flip the leather strap cover over the front of the head to expose the lacing.
3. Loosen the lacing
Unlace the first three or four sets of eyelets and progressively loosen the remaining lacing.
Don't force the hood.
4. Remove the hood
Once the hood is sufficiently loose, gently lift it away from the chin and upwards.
Alternatively, loosen both sides around the back of the head and gently lift the hood away.
Take your time and allow the leather to move naturally rather than pulling aggressively.
MOST IMPORTANTLY
Take your time, stay relaxed and never rely on being able to "push through" discomfort.
A good fit should feel secure without causing pain, excessive pressure or difficulty breathing. If anything feels wrong, stop and remove the hood.
The goal is to enjoy the experience while remaining completely in control of your own safety.